JavaScript Snowflake
It’s getting to be that time of the year again. Soon I’ll have to break out the shovel, but before then, I thought I’d put together a short tutorial on how to draw a snowflake using JavaScript and the HTML canvas element.
Here’s what the final product will look like:

If you’d like to try this out on your own, here’s what you’ll need:
- A text editor. Notepad.exe will work fine for this.
- A browser that supports the HTML 5 canvas element. This can be any one of the following browsers:
| Browser | Version |
| Chrome | ≥ 29.0 |
| Firefox | ≥ 23.0 |
| Internet Explorer | ≥ 9.0 |
| Safari | ≥ 5.1 |
The Basics
To get started, we’ll create a basic HTML document with a canvas element, script tag and a simple draw function. Open your text editor program and type in, or copy and paste, the following:
<!DOCTYPE html>
<html>
<head>
<title>Snowflake</title>
<script type="text/javascript">

function draw() {
	var canvas = document.getElementById('myCanvas');
	if (canvas.getContext) {
		var context = canvas.getContext('2d');
	}
}

</script>
</head>
<body onload="draw();">
<canvas width="640" height="640" id="myCanvas"></canvas>
</body>
</html>
Now save this as an HTML document, for example, snowflake.html. Make sure that the extension is .html and not .txt. After you save the file, you could open it in a browser, but unfortunately you won’t see much at this point. This will be the framework around which we’ll build the rest of our snowflake drawing program.
Things to note:
- Line 17: Our canvas element, on which we’ll be drawing our snowflake, has been given an ID of “myCanvas” and is 640 by 640 pixels.
- Line 16: The JavaScript draw function is called after the page is loaded.
- Line 8: In our draw function, a reference to the canvas element is obtained from the document object using the method getElementById.
- Line 10: The 2D drawing context is obtained from the canvas element by calling its getContext method. If available, the context can then be used to draw to the canvas element.
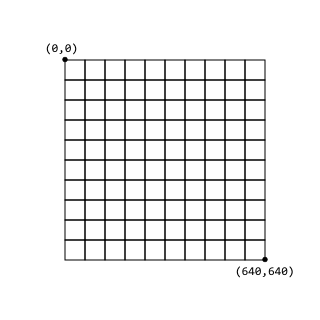
The context is the 2D Cartesian surface with its origin represented by the coordinates (0,0) in the upper left corner. The y-coordinate increases as we move downward and the x-coordinate increases as we move to the right. In our example, the lower right coordinates for the 2D canvas context are (640,640), as shown below:
Snowflake Symmetry
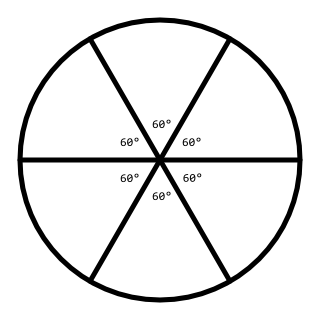
What do we know about a snowflake? They’re ice crystals that form with six, generally symmetric, arms. To draw our snowflake we’ll have six evenly distributed lines radiating from the center of our drawing. Imagine that our snowflake sits within a circle, each arm extends from the center of the circle to the outer edge of the circle. Since a circle is 360°, or 2π radians, the angle between each arm is 60°, or π/3 radians, as illustrated below:
Translation Please
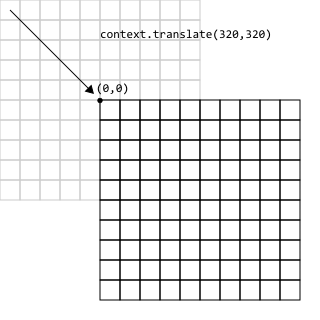
To make things easier for us, the 2D context object provides the translate method which shifts the 2D context to a new position. The advantage of this is that we can locate the origin wherever we want to by using translate, rather than calculating the offset from the upper left corner of the drawing surface. In our case it would be really helpful to relocate the origin to the center of the drawing surface. We can do this by calling the translate function with the new x and y coordinates for the origin. Since our canvas is 640 pixels wide and 640 pixels high, the midpoint is (320,320), which is where we want our new origin, as shown in the illustration below:
Now, we were easily able to determine what the midpoint should be because we’d specifically defined our canvas with dimensions of 640px x 640px, but what if we decide to change those dimensions in the future? Wouldn’t it be easier to have our program calculate the midpoint for us? Since we’ve obtained a reference to the canvas element using the function getElementByID, we can get the width and height properties of the element and store those in variables named width and height. We can then calculate the midpoint where we would like to translate the 2D context to as width/2 and height/2:
function draw() {
	var canvas = document.getElementById('myCanvas');
	if (canvas.getContext) {
		var context = canvas.getContext('2d');
		var width = canvas.width;
		var height = canvas.height;
		context.translate(width/2,height/2);
	}
}
Painting a Path with Brush Strokes
There are two steps to drawing a line, first we must define a path, then we can make it visible by applying a brush stroke. To accomplish this, we’ll use the context methods beginPath, moveTo, lineTo and stroke to draw our line.
When starting a new path, we must call the method beginPath first. The function moveTo establishes where our path will start from, in our case we want to start from the origin (0,0), so we call the moveTo method with those coordinates. Next, we’ll call lineTo with the coordinates of the point to which we want to draw a line (300,0). Finally, we can apply a brush stroke to the path to make it visible by calling stroke.
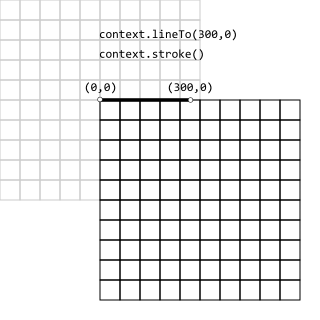
When we put it all together, our draw function now looks like:
function draw() {
	var canvas = document.getElementById('myCanvas');
	if (canvas.getContext) {
		var context = canvas.getContext('2d');
		var width = canvas.width;
		var height = canvas.height;
		context.translate(width/2,height/2);
		context.beginPath();
		context.moveTo(0,0);
		context.lineTo(300,0);
		context.stroke();
	}
}
Edit the draw function as shown above and then save your snowflake.html file. If you open the document in a browser now, you should see the line that we just drew:

That doesn’t look like much, does it? We can dress this up a little bit by changing the background color, the color and width of the line and the line end cap style.
Try it out:
- How can you change the length of the line?
- How can you change where the line starts from? For example, instead of starting from the origin (0,0) pick a different point, what happens?
- What if you remove the line that reads context.translate(width/2, height/2)? Where is the line drawn? Try experimenting with different coordinates for the translate command.
Adding Some Style
Colors are defined in terms of red, green and blue components. The minimum value that can be assigned to a color component is 0, the maximum is 255 or FF in hexadecimal (base-16). When specifying a color using hexadecimal notation, the value is prefixed with the # character. To get bright red, the red component is set to to its maximum value (FF), while the green and blue components are set to their minimum values (00), giving us “#FF0000”, likewise bright green is “#00FF00” and bright blue is “#0000FF”. To get pure white, all three components are set to their maximum values, “#FFFFFF”, while to get black, they are all set to their minimum values, “#000000”.
For this project, I chose a dark blue which includes red and green components as well as blue “#162D50”. For the brush stroke color for the line, I chose white “#FFFFFF”. You can experiment with changing these values to get colors that you like, or you can choose a color using a color picker tool.
The context property strokeStyle can be used to set the color of the brush that we use to paint the path with. Likewise, the context property fillStyle can be used to set the color that we use to fill in a shape with. We’ll use this property with the method fillRect to set the background color of our canvas. The property lineWidth sets the width of the brush in pixels, and lineCap sets the style of the end caps for the line. The lineCap can be set to “butt”, “round”, or “square”. For our snowflake I’ve chosen to use a round end cap to each line.
The updated draw method, shown below, sets the properties for the fill and stroke, and draws a rectangle the size of the canvas using the dark blue fill color.
function draw() {
	var canvas = document.getElementById('myCanvas');
	if (canvas.getContext) {
		var context = canvas.getContext('2d');
		var width = canvas.width;
		var height = canvas.height;
		context.lineWidth = 20;
		context.lineCap = 'round';
		context.fillStyle = "#162D50";
		context.strokeStyle = "#FFFFFF";
		context.fillRect(0,0,width,height);
		context.translate(width/2,height/2);
		context.beginPath();
		context.moveTo(0,0);
		context.lineTo(300,0);
		context.stroke();
	}
}
If you update the draw function with the code shown above and save the file, when you view the result in a browser you should see something similar to this:

That’s better, but it’s still not much, is it?
Try it out:
- Pick another set of colors for the background and line color.
- Change the width of the line.
- Change the end cap style to “butt” or “square”
Rotation
Recall that previously we had said that a snowflake has six arms that are distributed evenly, and that the angle between each arm is 60°, or π/3 radians. Therefore, our next step will be to draw another line, starting from the origin, and forming an angle of 60° with our first line. Thankfully, the context object provides us with another method, rotate, that makes our lives easier when it comes to this. Just as we had redefined the origin by using the translate method to move the context, we can employ the rotate method to turn the entire context a specified angle in radians relative to its existing position, as shown below:
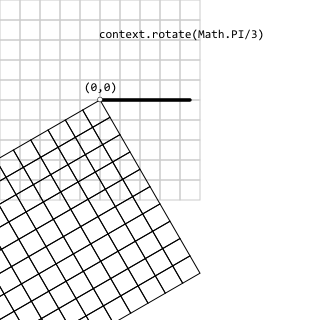
Now that we’ve rotated the context, we can draw our second line. Since the origin remains the same as with our first line, the code to draw our second line is exactly the same as our first line:
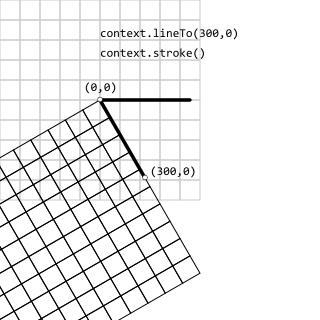
Here’s our updated draw function:
function draw() {
	var canvas = document.getElementById('myCanvas');
	if (canvas.getContext) {
		var context = canvas.getContext('2d');
		var width = canvas.width;
		var height = canvas.height;
		context.lineWidth = 20;
		context.lineCap = 'round';
		context.fillStyle = "#162D50";
		context.strokeStyle = "#FFFFFF";
		context.fillRect(0,0,width,height);
		context.translate(width/2,height/2);
		context.beginPath();
		context.moveTo(0,0);
		context.lineTo(300,0);
		context.stroke();
		context.rotate(Math.PI/3);
		context.beginPath();
		context.moveTo(0,0);
		context.lineTo(300,0);
		context.stroke();
	}
}
Update the draw function and save the file. When you view the result in the browser you should see the second arm of our snowflake:

Now we’re getting somewhere!
Wash, Rinse, Repeat
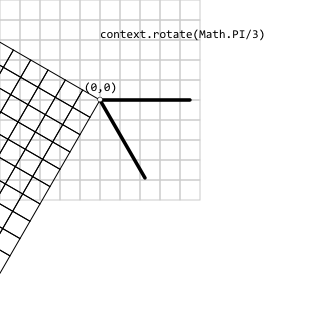
To draw the next arm, we perform the same steps once again. First we rotate the context:
Then we draw a line:
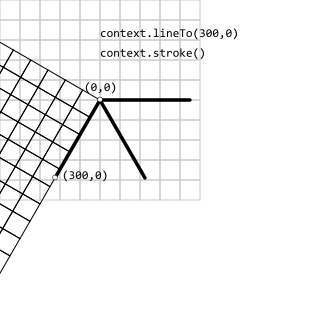
Here’s what the code should look like now:
function draw() {
	var canvas = document.getElementById('myCanvas');
	if (canvas.getContext) {
		var context = canvas.getContext('2d');
		var width = canvas.width;
		var height = canvas.height;
		context.lineWidth = 20;
		context.lineCap = 'round';
		context.fillStyle = "#162D50";
		context.strokeStyle = "#FFFFFF";
		context.fillRect(0,0,width,height);
		context.translate(width/2,height/2);
		context.beginPath();
		context.moveTo(0,0);
		context.lineTo(300,0);
		context.stroke();
		context.rotate(Math.PI/3);
		context.beginPath();
		context.moveTo(0,0);
		context.lineTo(300,0);
		context.stroke();
		context.rotate(Math.PI/3);
		context.beginPath();
		context.moveTo(0,0);
		context.lineTo(300,0);
		context.stroke();
	}
}
Getting Loopy
Are you noticing a pattern? This is getting awfully repetitive, isn’t it? To save ourselves the trouble of typing the same thing over and over again, we can use a for loop instead. The for loop requires that we provide three statements: a statement that gets executed prior to the start of the loop, a condition which must be met to continue the loop, and a statement that gets executed after each pass through the loop. In our case, we want to execute the code that draws the line and rotates the context six times. We’ll use a variable to keep track of how many times to execute the block of code, let’s call it count. We’ll set it to zero initially, check to see that it is less than six in order to continue our loop, and add one to it after each pass. We’ll put the code that we want to execute repeatedly within the loop block.
The new version of our draw function that uses a for loop now looks like this:
function draw() {
	var canvas = document.getElementById('myCanvas');
	if (canvas.getContext) {
		var context = canvas.getContext('2d');
		var width = canvas.width;
		var height = canvas.height;
		context.lineWidth = 20;
		context.lineCap = 'round';
		context.fillStyle = "#162D50";
		context.strokeStyle = "#FFFFFF";
		context.fillRect(0,0,width,height);
		context.translate(width/2,height/2);
		for(var count = 0; count < 6; count++) {
			context.beginPath();
			context.moveTo(0,0);
			context.lineTo(300,0);
			context.stroke();
			context.rotate(Math.PI/3);
		}
	}
}
Things to note:
- Line 13: Starts our for loop. The first statement “var count = 0;” declares the variable count and sets it equal to zero. The next statement “count < 6;” is the condition that must be met for the loop to continue. The last statement “count++;” adds one to the count variable after each pass through the loop. The ++ notation is shorthand for count = count + 1.
- Lines 14-17: This is the code that we want to execute during each pass of the loop. First we draw our line, then we rotate the context. Note that the block of code to be executed must be enclosed by curly braces { }.
If you change your draw function and view the result in a browser you should now see all six arms of our snowflake:

Try it out:
- Can you change the number of arms that are drawn? Can you draw 8 arms, 12 arms? Where do you need to make changes in order to get the correct number of arms drawn?
- What happens when you change the starting point for each line? For example, what happens when you change the starting point from (0,0) to (0,50)? What about (50,0)? Try experimenting with different values.
- EXTRA CREDIT 1: Can you gradually increase the length of each arm from zero up to the full 300 pixel length? HINT: Think about how you can use the count variable here.
- EXTRA CREDIT 2: Can you draw two different sets of lines, an inner line and an outer line? How can you get the program to draw the picture shown below?

Branches
What we have now is nice, but it doesn’t really look like the snowflake at the start of this article, does it? It’s missing something…
We’re going to use the translate and rotate methods that we had used earlier to add branches to the arms of our snowflake. First we’ll draw a segment of our line and then we’ll translate the context so that the origin is the endpoint of the line. Next we’ll rotate the context and draw one branch, then we’ll rotate in the opposite direction and draw the second branch.
To make this code somewhat easier to read, we’ll break up these tasks by writing two new functions, drawSegment and drawBranch. We’ll call drawSegment three times to draw each of the segments of our snowflake arm. In turn, the drawSegment function will call the drawBranch function twice, once for each direction that we are drawing the branch.
Here’s the final version of the draw function as well as the two new functions drawSegment and drawBranch:
function draw() {
	var canvas = document.getElementById('myCanvas');
	if (canvas.getContext) {
		var context = canvas.getContext('2d');
		var width = canvas.width;
		var height = canvas.height;
		context.lineWidth = 20;
		context.lineCap = 'round';
		context.fillStyle = "#162D50";
		context.strokeStyle = "#FFFFFF";
		context.fillRect(0,0,width,height);
		context.translate(width/2,height/2);
		for(var count = 0; count < 6; count++) {
			context.save();
			drawSegment(context, 100, 40);
			drawSegment(context, 100, 80);
			drawSegment(context, 100, 0);
			context.restore();
			context.rotate(Math.PI/3);
		}
	}
}

function drawSegment(context, segmentLength, branchLength) {
	context.beginPath();
	context.moveTo(0,0);
	context.lineTo(segmentLength,0);
	context.stroke();
	context.translate(segmentLength,0);
	if (branchLength > 0) {
		drawBranch(context, branchLength, 1);
		drawBranch(context, branchLength, -1);
	}
}

function drawBranch(context, branchLength, direction) {
	context.save();
	context.rotate(direction*Math.PI/3);
	context.moveTo(0,0);
	context.lineTo(branchLength,0);
	context.stroke();
	context.restore();
}
Things to note:
- Line 14: We introduced the context save method here. This function saves the current attributes of our context so that it can be restored at a later point. This allows us to apply translations and rotations to the context without affecting operations that follow, as long as we restore to the point at which we saved the context.
- Lines 15-17: The new drawSegment function is called three times. For each call we pass in the context and a segmentLength of 100 pixels. The branchLength is set to 40 pixels on the first call, 80 pixels on the second call and on the third call it is zero, meaning that no branches should be drawn.
- Line 18: The context restore method is called to restore the original context so that the next arm can be drawn.
- Lines 25-28: The drawSegment function starts by drawing a line.
- Line 29: The origin is moved to the endpoint of the line that was just drawn by calling translate.
- Lines 30-33: If the branchLength is greater than zero, we call the drawBranch function twice, changing direction on the second call. The direction can be either 1 or -1 to indicate right or left.
- Lines 36-43: In our drawBranch function the context is first saved, then it is rotated in the specified direction, either right (1) or left (-1). A line is drawn, and finally the context is restored.
If you enter the code and save the updated file, when you view the HTML document in your browser you should see the completed snowflake:

Try it out:
- Try changing the length of the segments and the branches. What happens if you put branches on the last segment?
- Try adding another segment to each arm. What do you have to do to the lengths of each segment?
- EXTRA CREDIT: Rather than using a fixed value of 100 pixels for segment length, can you calculate the segment length as a ratio of the canvas width?
Final Thoughts
Thanks for following along, I hope you were able to get your program to draw a snowflake, and that you tried to experiment with the code to see how it affects the drawing. Good luck and keep experimenting!
The complete source code for this project is maintained at:

Leave a Comment
Your email address will not be published. Required fields are marked *